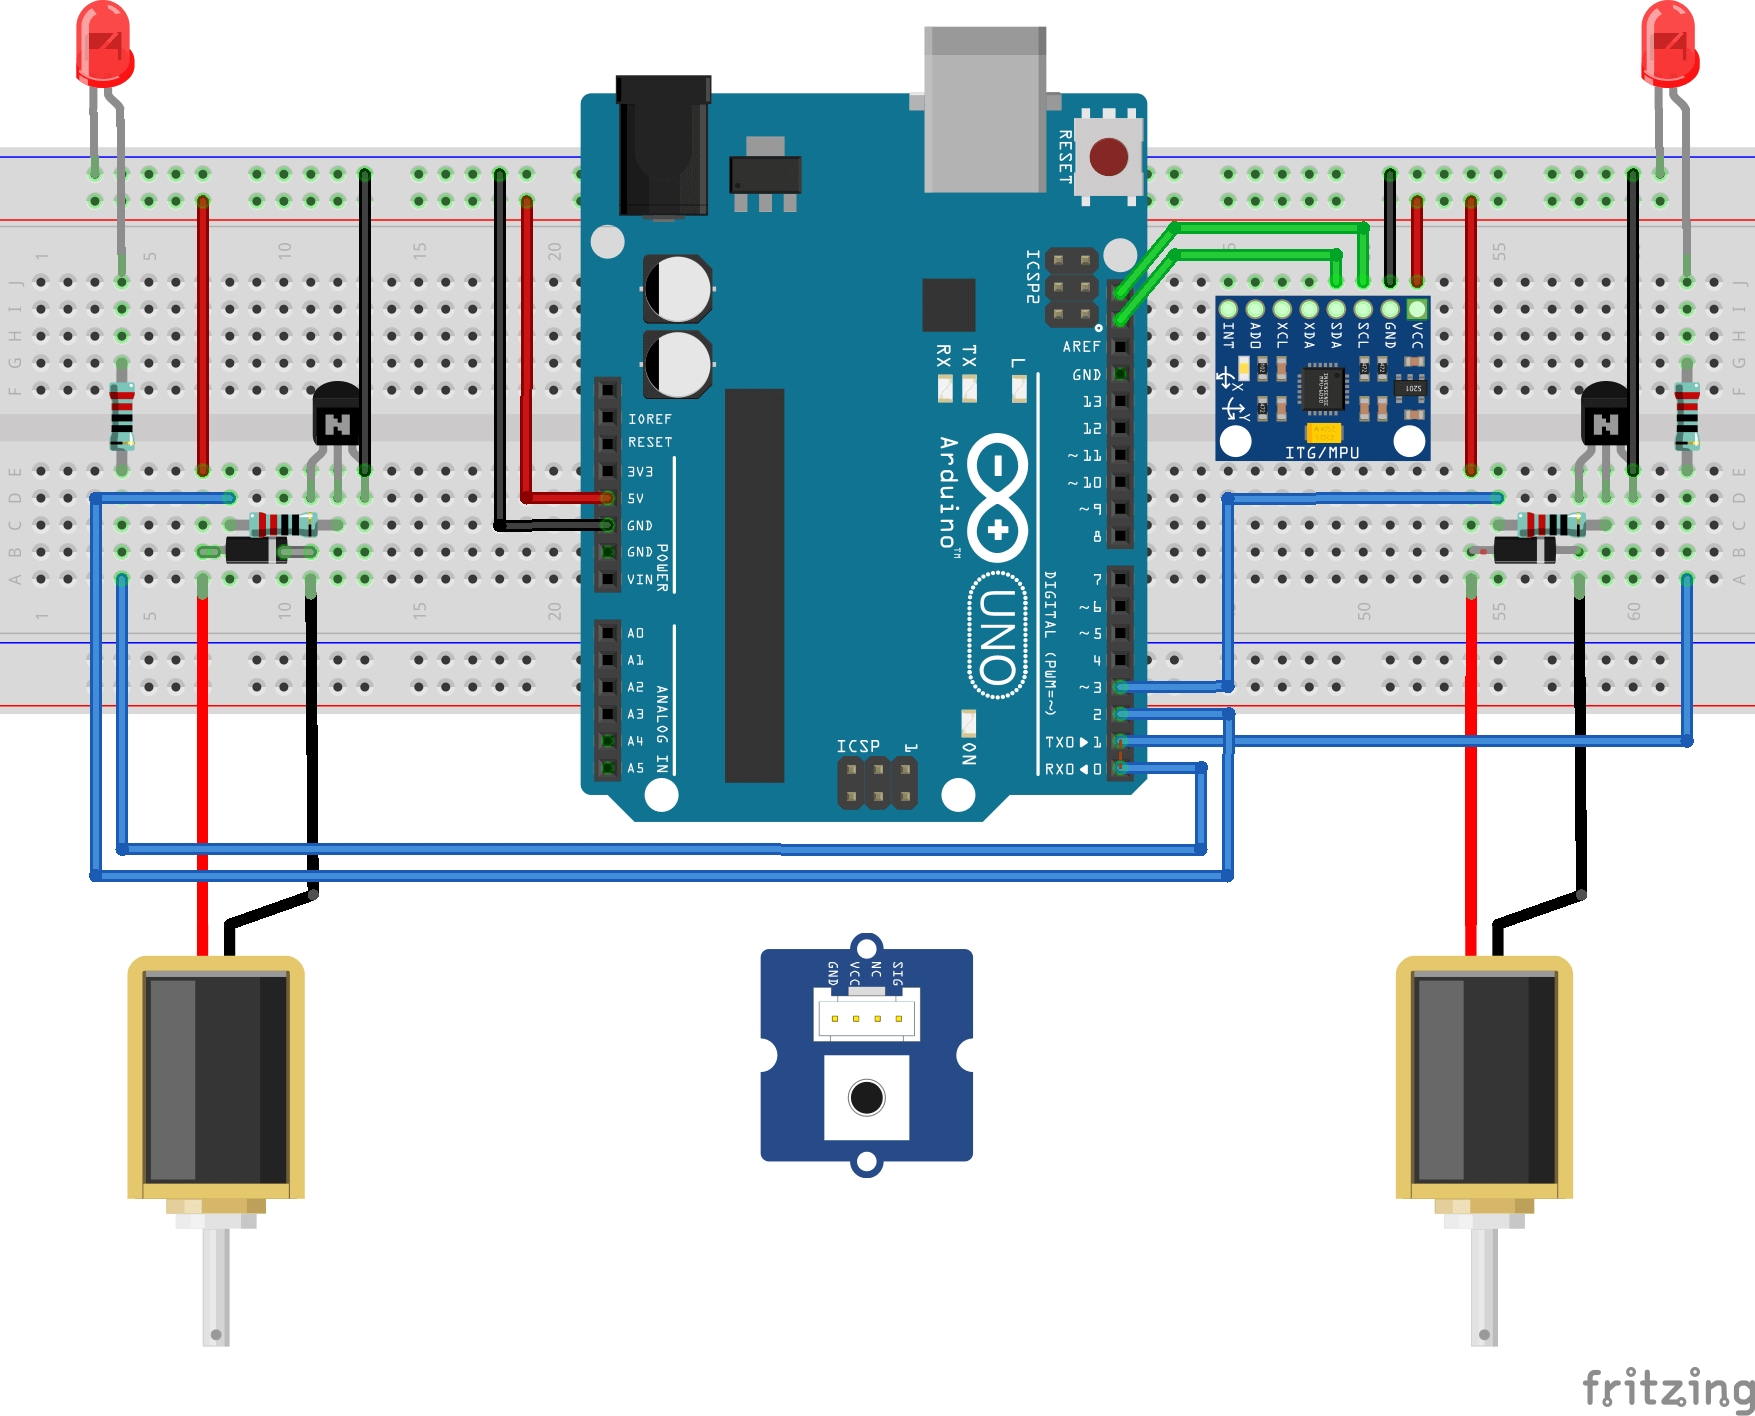
// MPU 6050   --->   Arduino
//
//  VCC   ----->   3.3v
//  GND   ----->   GND
//  SCL   ----->   A5 pin
//  SDA   ----->   A4 pin

#include <Wire.h>
const int MPU = 0x68; // I2C address of the MPU-6050
int32_t AcX, AcY, AcZ, Tmp, GyX, GyY, GyZ, button;
// value returned is in interval [-32768, 32767] so for normalize multiply GyX and others for gyro_normalizer_factor
// float gyro_normalizer_factor = 1.0f / 32768.0f;

int led1Pin = 0;
int led2Pin = 1;
int solenoid1Pin = 2;
int solenoid2Pin = 3;
int buttonPin = 7;
int buttonInterval = 100;

void setup()
{
  pinMode(led1Pin, OUTPUT);
  pinMode(led2Pin, OUTPUT);
  pinMode(solenoid1Pin, OUTPUT);
  pinMode(solenoid2Pin, OUTPUT);
  pinMode(buttonPin, INPUT);

  Wire.begin();
  Wire.beginTransmission(MPU);
  Wire.write(0x6B); // PWR_MGMT_1 register
  Wire.write(0);    // set to zero (wakes up the MPU-6050)
  Wire.endTransmission(true);

  Serial.begin(57600);
  Serial.flush();
}

int checkButton()
{
  unsigned long currentMillis = millis();
  static unsigned long previousMillis = 0;
  int buttonState = digitalRead(buttonPin);
  int currentState = digitalRead(solenoid1Pin);

  if (currentMillis - previousMillis >= buttonInterval && buttonState == HIGH)
  {
    previousMillis = currentMillis;
    if (currentState == LOW)
    {
      digitalWrite(led1Pin, HIGH);
      digitalWrite(led2Pin, HIGH);
      digitalWrite(solenoid1Pin, HIGH);
      digitalWrite(solenoid2Pin, HIGH);
    }
    else
    {
      digitalWrite(led1Pin, LOW);
      digitalWrite(led2Pin, LOW);
      digitalWrite(solenoid1Pin, LOW);
      digitalWrite(solenoid2Pin, LOW);
    }
  }

  return buttonState;
}

void sentSensorData()
{
  //read MPU450's accelerometer and sent it to serial port
  Wire.beginTransmission(MPU);
  Wire.write(0x3B); // starting with register 0x3B (ACCEL_XOUT_H)
  Wire.endTransmission(false);
  Wire.requestFrom(MPU, 14, true); // request a total of 14 registers

  //accelerometer
  AcX = Wire.read() << 8 | Wire.read(); // 0x3B (ACCEL_XOUT_H) & 0x3C (ACCEL_XOUT_L)
  AcY = Wire.read() << 8 | Wire.read(); // 0x3D (ACCEL_YOUT_H) & 0x3E (ACCEL_YOUT_L)
  AcZ = Wire.read() << 8 | Wire.read(); // 0x3F (ACCEL_ZOUT_H) & 0x40 (ACCEL_ZOUT_L)
  button = checkButton();
  Serial.print(AcX);
  Serial.print(";");
  Serial.print(AcY);
  Serial.print(";");
  Serial.print(AcZ);
  Serial.print(";");
  Serial.print(button);
  Serial.println(";");
  //Serial.print(int16_t(5)); Serial.print(";"); Serial.print(int16_t(10)); Serial.print(";"); Serial.print(int16_t(15)); Serial.println(""); //temp

  //gyroscope
  //Tmp=Wire.read()<<8|Wire.read();  // 0x41 (TEMP_OUT_H) & 0x42 (TEMP_OUT_L)
  //GyX=Wire.read()<<8|Wire.read();  // 0x43 (GYRO_XOUT_H) & 0x44 (GYRO_XOUT_L)
  //GyY=Wire.read()<<8|Wire.read();  // 0x45 (GYRO_YOUT_H) & 0x46 (GYRO_YOUT_L)
  //GyZ=Wire.read()<<8|Wire.read();  // 0x47 (GYRO_ZOUT_H) & 0x48 (GYRO_ZOUT_L)
  //Serial.print(GyX); Serial.print(";"); Serial.print(GyY); Serial.print(";"); Serial.print(GyZ); Serial.println("");
}

void loop()
{
    sentSensorData();
    Serial.flush();
    delay(20);
}